Thursday, November 24, 2011

Giant Elastic Christmas Wreath

I was out thrifting the other day when I came across this 10 foot roll of red and white checked elastic “ribbon”.  I immediately thought that it would make a great Christmas wreath, since it would wrap tightly with no gaps.  Oh, and it was $3, so I snatched it up and ran…to the register that is…

Nov 24 2011 025

I took a large styrofoam wreath form that I bought at Michaels (with my 40% off coupon) and used straight pins to attach the elastic to the form.  This one was very easy, since the elastic pulled nice and tight.  I bought a pretty glittered white poinsettia and some other glittery red “picks” from Michaels and glammed up this otherwise plain wreath.

Nov 24 2011 021

I hung my wreath with two types of material- twine and sparkly ribbon.  I’m still not sure which I like best.  I’ll post both pictures.  Let me know which you like best.  That way I’ll know somebody is reading along : )

November 24 2011 002
Hung with basic green twine

Nov 24 2011 021b
Hung with glittery wide ribbon

Yes, I’m posting a Christmas wreath on Thanksgiving day.  Gotta do something constructive while the macaroni and cheese bakes! 

I hope you and those you love have a blessed Thanksgiving Day.



Linking up to these great parties:

Crafty Scrappy Happy Me Thursday, It's a Party at A Creative Princess, Serenity Now Weekend Bloggy Reading, Linkin with Lil Luna, Flamingo Toes Think Pink Sundays


Sunday's Best Linky Party!


DIY under $5


”lil


Friday, November 18, 2011

Tote bag using the Citrasolv transfer method

Before I dive into the how-to for my little tote bag this week, I want to say THANK YOU to all of you who are following my little blog!  I reached a milestone this week when I hit 100 followers!   Wow!  I can’t believe that 100 people have ever even looked at my blog!  The number snuck up on me, so I don’t have any fabulous giveaways or anything –yet.  But stay tuned, I might have something up my sleeve before Christmas.  Keep watching, because I wouldn’t want you to miss it…
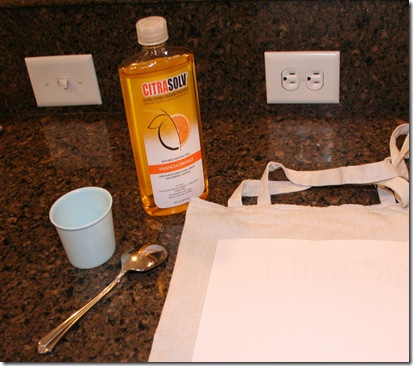
I have seen the Citrasolv transfer projects all over the internet. My friend Jaime at Crafty, Scrappy, Happy did a couple of adorable tote bags, and I wanted to try my hand at it too.  Citrasolv is an all natural degreaser that can also be used in crafting as a transfer agent.  The website has loads of helpful information.  My #1 piece of advice for Citrasolv is that if you want to get some, start looking waaayyy before you decide you need it, or simply order online.  This stuff is hard to find.  I found mine at a little health food store in St. Augustine, when the hubs and I were on our anniversary trip (I know- so romantic!).

There are many tutorials all over the web, so I’m going to make mine very simple.  Leave me a comment if you have any questions, and I’ll be happy to help, if I can.

Citrasolv transfer tote bag 7

Sorry for the horrible lighting.  My usual outdoor picture spot was already shady today when I went out for the “photo shoot”.  I saw this little phrase on Pinterest the other day, and couldn’t help but file it away for later and giggle.  I have several friends who are big readers… Maybe one of them will get this little bag for Christmas.  Hope they aren’t reading this!  If you don’t “get” this phrase, thank your lucky stars that you missed out on that song in the early 90’s.  Just sayin'!

Okay, here’s what you do.  Create a document or grab a graphic that you will either print or copy in black and white using a laser printer or copier.  It must be laser, or the transfer will not work.  When you print out your words or image, choose mirror image so it will print in reverse.  That way the ink will be sitting on top of your fabric like so:

November 18 2011 013

   November 18 2011 011

Then you will take a small sponge or paintbrush and dip it into the Citrasolv and wet your paper so that it soaks through to the fabric.  Don’t drench it, but use enough so that the letters get good and wet.  Then take the back of a spoon, and rub really hard on the letters to make sure that they transfer.  Look at this tutorial for pictures of this step.  You may want to peek to see if it’s working, but don’t move your image around.  Once you are sure that everything has transferred, you can peel back your paper and toss it away.  Your bag is finished!  Easy peasy!


Nov 18 2011 012

I used a linen type bag, so my lettering is kind of faded looking.  I like it like that, but if you want crisp black, use a white fabric and make sure your image is really dark when you copy it.

I added a little denim flower to finish it off.  I liked the faded denim against the linen bag and “faded” lettering.  The flower is a pin that can be taken off and worn on a jacket or purse as well.  A gift that keeps on giving!  I followed this tutorial at Jones Design Company for the flower.  She has the best flower tutorials around!  This one even has templates you print and cut.  So simple…

Nov 18 2011 008

So, that’s how you make a Citrasolv transfer tote bag.  Easy right?  I’m gonna practice using some different images and fabrics.  I’ll be back to show you those later on.  Okay?

Happy Thanksgiving!


Linking up to these great parties:

30 Days Pity Party, Weekend Wrapup at Tatertots and Jello, Crafty, Scrappy, Happy Me Thursday, Show and Share at Southern Lovely, Time to shine at A diamond in the Stuff, Weekend bloggy Reading at Serenity Now, Free for all at Young and Crafty, Think Pink Sundays at Flamingo Toes, Nifty Thrifty Sunday

Saturday, November 12, 2011

$1 Laundry room shelf

I’m thinking about changing the name of my blog to “Everything’s $1”.  Not really, but the last few projects I’ve posted about have been ultra-thrifty!  This little shelf is no exception.  I bought it from a yard sale for $1.00.  Everyone loves a good before and after, so here you go.

Nov 12 2011 002
Before: your basic 1980’s kitchen shelf complete with a weird picture of a nest, some onions, books, a salt shaker, a pomegranate and some butterflies.  I’m pretty sure all the bases were covered with this one!

Nov 12 2011 029

After:  A little shelf with some personality.  At least now it has only one personality and isn’t trying to be so many things like it was in the 80’s : )

You really don’t need a tutorial for this one, but I’m gonna give you a brief one anyway. 

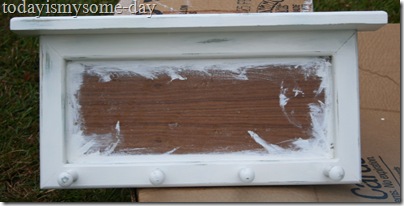
First I scraped off the 1980’s mixed up decal.  It left the surface quite gummy, so I knew I didn’t want to paint over that.  I spray painted the shelf Krylon Blue Ocean Breeze.  Then I brushed on some white latex paint over it.  I let it dry overnight and then took my sandpaper to the edges to rough it up a bit. 

Nov 12 2011 016 

I mod podged some cute blue scrapbook paper that looks like water droplets onto my already gummy surface inside the “frame”. 

I then cut out some stencils on cardstock using my Silhouette.  I used the letter cutouts to place my wording, and I used red craft paint to stencil the words, “It all comes out in the Wash” onto my frame.  I learned the hard way on this project that mod podge is slick and the paint from your stencil will run if you are not super careful- trust me, I tell you.

Nov 12 2011 018

I then took 2 metal buckets that I bought from Michael’s and slapped a Silhouette vinyl label on each of them.  One is for coins found in the washer or dryer and the other is for the miscellaneous odds and ends that I always seem to find in our laundry.  You wouldn’t believe the legos, pens, pencils, erasers, toys, and other “important” items that my kids leave in their pockets.  Now, instead of them sitting on top of the washer or dryer in piles, they can be placed in the buckets.  If they are not claimed in a reasonable amount of time, they become the property of mom : )

Nov 12 2011 028

So, this was a simple project that anyone could do to tidy up their laundry area or another problem area of the house.  All you need is a $1 shelf.  If you can’t find one, just ask me, I think I may have a few more squirreled away…


Happy organizing!


Linking up to these great parties:

Think Pink Sundays at Flamingo Toes, Crafty Scrappy Happy Me Thursday, Show and Share at Southern Lovely, Weekend Wrap up party at Tatertots and Jello, Time to Shine at A Diamond in the Stuff, Whatcha got Weekend at Lolly Jane, Saturday Seven at Positively Splendid, Too cute Tuesday At Funky Polka Dot Giraffe, Metamorphosis Monday at BNOTP, Show me whatcha got at Not just a Housewife, Frugalicious Friday at Finding Fabulous


The DIY Show Off


DIY under $5


Photobucket

Thursday, November 3, 2011

Dollhouse from dollar shelf

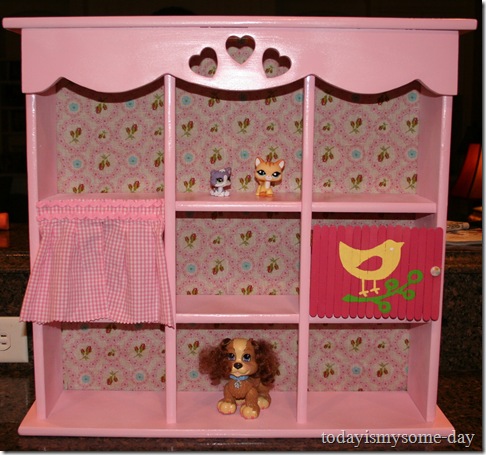
I picked up this shelf from a yard sale a while back for a dollar.  I knew immediately what I wanted to do with it.  I had seen this Petshop Playhouse at Kiki Creates.  She used a wooden shelf to create a “home” for her daughter’s Littlest Petshop toys.  Mine doesn’t have drawers to store the pets/dolls in, but it will keep the toys off of the floor and will be a fun place for my daughter to play with her little people and animals.

It all started with this:                  

Nov 2 2011 001

and this is the after:                                        

Nov 3 2011 023


Yes!  I see the 1992 heart themed cut-outs!  And I totally planned to cover them up somehow.  But my daughter saw the hearts and thought they were “cute”.  So they had to stay :(  

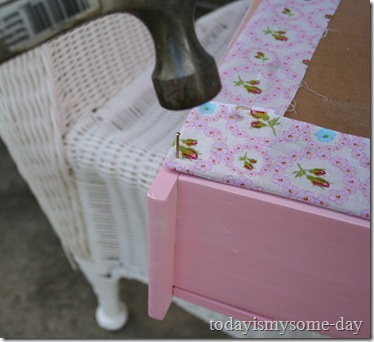
The shelf had been primed white.  So, I just wiped it down and spray painted it with Krylon’s Ballet Pink.  Then I cut a piece of cardboard to fit the back of my shelf.  I then cut a piece of pretty pink floral fabric from my stash about an inch larger than the cardboard all the way around.  Then I just stapled the fabric to the cardboard with a regular stapler.  I stayed close to the edge so that the staples wouldn’t show later. 

Nov 3 2011 002

After my fabric was stapled on, I nailed the cardboard to the corners of my shelf.

Nov 3 2011 005

Nov 3 2011 007

Now that the back of my shelf is covered, it’s pretty, and no toys will fall through to the other side :)

My daughter asked me to add a dressing room with “curtains” for her dolls to change their clothes.   I didn’t want to have to sew, so I got creative with this one. 

Nov 3 2011 011
This pair of 9-12 month overalls had been somehow left behind when most of the baby clothes were given away. My daughter is now 6 years old! 

   
Nov 3 2011 016


Anyway, I cut the overalls just above the pleats and used them for curtains.  I ironed them and hot glued  some ric rac at the top, and they came out great!

I then decided that I needed to add a door or gate to the house as well.  I spray painted some popsicle sticks a bright pink and hot glued them together to make a wooden gate.  For the hinge, I stole the hinge from a wooden plate stand.  These little hinges were the perfect size to attach my little pink gate.

Nov 3 2011 017   

It seems that I forgot to take a photo of the gate before I painted a little birdie on it and attached it to the house.  But here it is up close.

Nov 3 2011 028

I just love this little button that I used as a handle for the gate.  I found it in an old sewing box where I used to keep all of my barrette making supplies when I was in the 4th grade.  The little birdies on the button are just PERFECT!

Nov 3 2011 028b

This is everything together.  At the moment all of our little critters and people are trying the house out to see who gets to live here.  I’m hoping that it will help keep all of the small toys off of the floor and keep a smile on my little one’s face.  She is so excited over her new dollhouse!  That’s a lot of bang for a “buck”!

Nov 3 2011 023


Linking up to these great parties:

Catch as Can at My Repurposed Life, DIY under $5 at A Little Tipsy, Crafty, Scrappy, Happy Me Thursday, Share Awesomeness Thursdays at 36th Avenue, Time to Shine at A Diamond in the Stuff, The Idea Room linky party, Weekend Bloggy Reading at Serenity Now, 30 Days Pity Party, Feature yourself Friday, I'm lovin it Fridays at Tidymom, Show and Share with Just a Girl, Weekend Wrap-up Party At Tatertots and Jello, Weekend Showoff Party at Ladybird Lane, Frugalicious Friday at Finding Fabulous, Friday Flair at Whipperberry, Whatch Got Weekend at LollyJane, Think Pink Sundays At Flamingo toes, Sundae Scoop at I Heart naptime, Nifty Thrifty Sunday, Get your Craft on at Today's Creative Blog, November Before and After Party at Thrifty Decor chick, Nifty Thrifty Tuesday At Coastal Charm, Show and Share at Southern Lovely

Sunday's Best Linky Party!


Chic on a Shoestring Decorating


Saturday, October 29, 2011

The Pink Cheeks


This is a picture of me and my daddy. 


It is one of only a few candid pictures that I have of the 2 of us. He was not one for pictures, and come to think of it, I'm not really one to be in pictures either. Maybe you can see why? Do you notice the "pink" in our faces? I have fought that pink shine on my cheeks ever since I was a teenager and first started wearing makeup. I've used foundation and powder; cremes with green undertones, anti-shine serums, and just about everything else I can think of to tone down the pink. I never need blush! It wasn't until I saw this picture, which was taken 4 years ago, that I realized where my pink comes from- my precious daddy. My daddy died of stage 4 Pancreatic Cancer only a few months after this picture was taken. He was only 56 years old. I still miss him every day. I still don't LOVE the pink in my cheeks, but I've come to appreciate that it came from my daddy, and it will probably always be a part of me. It's a visual reminder that he's a part of me every time I look in the mirror.

Hold the ones you love tightly.  Kiss them; hug them; tell them that you love them.  You just never know when all you'll have left is a memory.


**this post was inpired by Laura at Pink Cake Plate Diaries.  She is doing a series "31 Days of Pink" in honor of breast cancer awareness.  She asked me to be a part of her 31 days and submit a photo with pink and tell what it meant to me**



Linking up to these great parties: 
Serenity Now Weekend Bloggy Reading

Wednesday, October 26, 2011

Thrifting for all seasons

I have done a few posts here and there about my garage sale and thrifting adventures.  I certainly haven’t shown you all of the junk stuff that I have gotten in the past few months.   But for those of you who haven’t tried your hand at second hand shopping, I wanted to show you what great stuff you can get for any season for just a few dollars. 

I generally pop into my favorite thrift stores, Goodwill, or Salvation army every so often just to see if there is anything that I can’t live without.  Usually there isn’t!  But once in a great while, I will find something that is seasonal (usually from a season opposite the one we are currently in), and I’ll pick it up for a couple of dollars.  I don’t go to garage sales all that often, maybe once a month or twice a month.  But, you can get some really great home décor, craft supplies, and furniture from these sales. 

So, for today, I went through some of my “stuff” and pulled together a couple of seasonal vignettes to show you what I’ve found.  Boy is there more to show you!!  I’ll leave furniture for it’s very own post.  Let’s just say that I am not going to buy anything BIG for a while.  The last time I bought big, it was 2 double doored “wardrobes” for my craft room and 2 seven foot book shelves.  Hubby’s back is probably still hurting :)

First up is the Christmas collection:
Oct 26 2011 005

These came from a garage sale.  They are a little GOLD for my taste!  But I’ll take off their excessively large collars and spray paint them white or maybe brown.  Anything to tone down the gold.  These pictures don’t do them justice; believe me they are bright!  But they were cheap!!

Oct 26 2011 010


This Nativity set has about six more pieces to it, including camels, a cow, and an angel.  The little stocking is hand made and I just loved the checked fabric.  The wreath in the back is lighted and it works!  The little red Merry Christmas pot is just too cute.  No plans for it yet…  As you  can see, you can find lots of craft supplies while thrifting.  The white thing in the back is a styrofoam cone that I’ll use to make a ribbon Christmas tree this year.  The roll of ribbon is 50 yards!  That’s a bunch of ribbon.  The green alien looking thing is the styrofoam form for a topiary.  I love topiaries, and I have about 5 of these forms.  Lastly, I have some floral stems.  These look great in arrangements.  I don’t know how to DO arrangements, but I’ll figure that out when the time comes…

The Fall Collection:

Oct 26 2011 029

I got this little acorn lantern from the Junior League Thrift sale.  I went on the 2nd day, and everything was 1/2 off.  Yippee!  I may or may not have had to buy a duffle bag while I was there to carry all of my loot…  The pumpkin baskets are from Goodwill; I’ve seen these same baskets at Michaels for quite a chunk of change.  The wooden bowl is from a garage sale as well.  It’s rustic. I love it. The end.

Oct 26 2011 040

I can use all of these items for Thanksgiving.  I got the bundle of “wheat” , black stand, and cornucopia from  garage sales.  I got 5 of those adorable feathered turkeys from the Junior League sale.  And the pumpkins are mine from around the house :)  And let’s not forget THE TURKEY that I got at a garage sale earlier this year.  It Will make its debut in a week or so, if hubby doesn’t burn it first!

Most of my Spring/Summer things have been put away in the attic.  You have seen some of my fabulous finds here.  But here are a few things I could still pull together easily for this post to show you.

Oct 26 2011 016

Here we have 3 wicker bird cages.  They need a coat of paint but will be adorable for Spring.  And I have a “thing” for birds, nests, and birdcages, so these were perfect.  Under the two cages on the table are 3 of those wooden trays that everyone is painting and redoing.  I’ll be painting these up soon myself.  The two prints were purchased from a friend of mine, who bought them at a yard sale.  They are both pictures of my beautiful city.  I guess they are 3rd hand :)  The polka dot tablecloth and the placemats on the right hand side are both from the Junior League sale- half price baby! 

Oct 26 2011 026


This is a close-up of the San Francisco tote that I got for 25 cents!  It’s a yellow burlap with some cute little wooden handles.  I like San Francisco as much as the next gal, but they aren’t paying me to advertise, so I will paint or applique over the “billboard” or just remove the handles and make my own tote.  I put a bunch of fabric pieces that I have gotten at yard sales inside to show you.  I’m brand new to sewing, but I LOVE fabric.  I bought this fabric by the handful or bagful; each time it cost about $1.  You can’t get that kind of deal anywhere else!

So, you see if you take a chance and try thrift shopping, you might just get a great deal on junk things you’ll really use and enjoy.

Happy Thrifting!


Linking up to these great parties.


Chic on a Shoestring Decorating


Sunday's Best Linky Party!


HOG


Nifty Thrifty Tuesday at Coastal Charm, Show and Share at Southern Lovely, Wow us Wednesdays at Savvy Southern Style, Creative Bloggers Party, Catch as Can at My Repurposed Life, Nifty Thrifty Sunday at Nifty Thrifty Things,  Time to Shine at Diamond in the Stuff