Wednesday, December 28, 2011

My top 5 Posts of 2011


I have only been blogging since April of this year, and it has proved to be a great adventure.  I never thought that anyone let alone many of you would like my little projects, but you did.  And it motivated me to do more and try new things.  There are still many things that I haven’t dipped my creative toes into yet.
Furniture painting is at the top of that list, and that’s what I plan to do in 2012.

But here is a look back at my top 5 posts of 2011.  I figured I only blogged for half a year, so I’d do only 5 favorites.
1)
Sept 15 2011 050a
My Thrifty Finds to Fall Décor was the biggest hit on the blog this year.  It was a combination of some really great garage sale finds and cheap Ikea mirror makeovers that created a fun Fall vignette.

2)
Sept 8 2011 007

This Sweater and Burlap Wreath has become my #1 Pinterest favorite!  I couldn’t be more thrilled that people are still pinning this one every single day.  The funny thing about this wreath is that I made it last Fall, before I started blogging,  and didn’t really love it.  So, I just put it away in a coat closet.  One week this Fall I didn’t have a project to post, so I dug it out and posted a tutorial on how to make it.  Well, it was a hit, and it even got featured on a little blog named Tatertots and Jello!  Maybe you’ve heard of it?  Squeal!!!

3)

sept 2 2011a 001

This Halloween wreath from upcycled leggings was a lot of fun!  I love the little t-shirt pom pom spider with the crazy eyes!  I like my Halloween décor to be kooky not spooky, so this fit the bill.

4)
Nov 3 2011 023

My Dollhouse from Dollar Shelf was a hit with lots of moms with little girls, who play with tiny toys : )  It was such a fun and easy transformation using only spray paint, fabric, and a few upcycled items I had on hand.  The best part of all is that I made something special for my daughter to enjoy.

5)


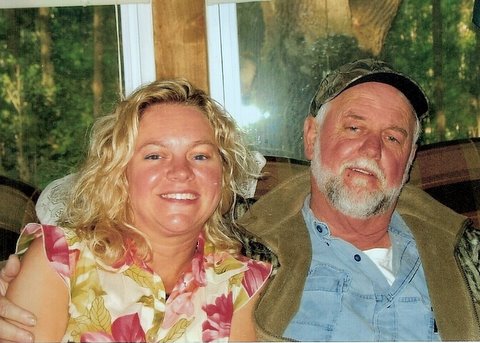
This last post- The Pink Cheeks is my favorite.  It’s my favorite, because it’s about me…and my daddy.  It didn’t get featured on any blogs or awarded for the wonderful writing.  But none of that matters, because I got to share something from my heart that I have only  learned to appreciate since my dad has passed away.  And sadly, it isn’t until we lose someone that we love that we come to appreciate the special things about that person.  It’s too late to tell them.  The moment has passed. 


I hope you've enjoyed my top 5 wrap-up.  I hope to be back with more fun projects in the new year!


Linking up to these great parties:

Top Projects 2011 at Southern Hospitality, Favorites from 2011 at Savvy Southern Style, Show me what ya got at Not just a housewife, Crafty, Scrappy, Happy me Thursday at Crafty Scrappy Happy, Think Pink Sundays at Flamingo Toes, Sundae Scoop at I heart Naptime


Sunday's Best Linky Party!


Somewhat Simple

Friday, December 23, 2011

I love Christmas Cards

Merry Christmas Everyone!

It's been a crazy couple of weeks leading up to Christmas.  I still have more to do tomorrow (Christmas Eve) than can possibly be completed.  But, I am determined to completely wear myself out in order to make things beautiful; cook delicious food; and fulfill as many of my children's Christmas wishes as I can.

I have really enjoyed going to the mailbox over the past few weeks.  I LOVE Christmas CARDS!!  I just enjoy seeing photos of friends and family and reading a bit of what everyone has been up to over this past year.

This post is probably too late to help you display your Christmas cards for this year, but there's always next year.

Here is our little Christmas card display.  It makes me smile whenever I pass by. 


Have a Blessed Christmas as we take this time to celebrate the birth of our Lord.


Wednesday, December 14, 2011

Window Nativity Silhouette

I am so excited to show you this week's project!  With Christmas speeding toward us and company coming to visit, it may be the last Christmas project I get to do this year.  But it’s extra special to me, because it’s a Nativity scene.  I have started a small collection of Nativity scenes over the years.  I usually get at least one new one every year, even if it’s just an ornament.

But…on to my project…

I don’t really have a tutorial on this, because it’s pretty basic and because I was so excited to get it put up that I forgot to take pictures along the way!

Window Nativity Silhouette

This is in a bay window in my home. 

Materials you will need:

  • White bulletin board paper
  • black poster board
  • X-acto knife with extra blades
  • sample of nativity scene for reference
  • chalk

This project came to mind the other day as I remembered all the cool silhouettes that people had done at Halloween for their windows.  However, this Nativity scene means so much more to me than any flurry of bats or jack-o-lanterns ever could.  It reminds me of the very reason that we celebrate Christmas in the first place- the birth of our Lord and Savior, Jesus Christ.  I love the Christmas trees, the wreaths, the snowmen, the reindeer and Santa, but THE reason I celebrate Christmas is to remember the birth of Christ.

For my silhouette, I just measured my window (I wish it did not have those grid thingies in it).  I purchased the white bulletin board paper from a teachers’ supply store to fit the window.  I got 4 sheets of thick black poster board and taped them together on the back.  I took this image from my Silhouette downloads and printed it out on paper so I’d have a reference for my drawing.

image

It would be a dream come true if the Silhouette would cut something this big!  But alas I am happy with all the cool stuff it does cut :) 

Hubby and I tag teamed and drew this image free hand onto the large poster board with a pencil.  We left out the star from the image above, because I thought it would be a pain to cut with an X-acto knife.  So, I found another image in the Silhouette store with a different star and downloaded it. 

image


Then I used my slice tool and detached the star and enlarged it in the Silhouette software and cut  this simple star on black cardstock. 

image

After we were satisfied with the pencil drawing, I went over it with white crayon, so that I could see really well to make my cut outs.  I should have used chalk, because I then had to go over some white crayon marks with a black paint pen when it was over.  If you use chalk, it will wipe right off, duh!

Then I took a really large TV box that we keep in the attic and I used it as my “cutting table”.  I laid out my poster board and went to work cutting out the silhouette of the Nativity.  It was relatively easy, except for the parts where the poster board was doubled.  I only broke one blade, but dulled 2 completely :)  Thankfully, I had won a fabulous box of Elmer’s craft supplies from Lil Luna a couple of weeks ago, so I had a few X-acto knives on hand.

After I cut it all out, we mounted it to the window with thick sticky dots.  We then taped the white paper up behind it.  We took a desk lamp with a moveable “head” and pointed it to the window; turned out the lights; and ran outside to see how it turned out.  I just love it! 

I don’t have any lawn decorations and/or other outside décor except for my front porch.  But this makes such a statement at night when it’s lit up for all to see. 

One more peek from a little further away.

Dec 14 2011 #2 005

Window Nativity Silhouette 1

Merry Christmas to you all, and may you be blessed as we celebrate His birth.


Linking up to these great parties:

Show and share at Southern Lovely, DIY under $5 at a Little Tipsy, Get your Craft on Tuesday at Today’s creative blog, Show and Tell at Blue Cricket Design, Strut your Stuff Thursday at Somewhat Simple, Free for all Friday at Sassy Sites, Frugal Friday at the Shabby Nest, Under $100 at Beyond the Picket fence, Friday Flair at Whipperberry, Pity Party at 30 Days, Weekend bloggy reading at Serenity Now, Weekend Wrap up Party At TaterTots and Jello, I'm lovin' it at Tidy Mom, Get Schooled Saturday at Too much time on my hands, Strut your Stuff Saturday at Six Sisters Stuff, Show me what Ya got at Not just a Housewife

Better late than never Christmas Inspirations


Home Stories A2Z


Photobucket


Tickled Pink at 504 Main


Positively Splendid


The 36th Avenue

Thursday, December 8, 2011

Frame your family Christmas cards

I’ve been crunched for time this week, so I haven’t done anything “creative”.  I’m itching to though!  You’d better believe it! 

But I wanted to share something that we have done every year since our oldest child was born.  We started sending out Christmas cards.  We either send out photo Christmas cards or send out a traditional card and include a photo.  Most years our cards have included mom, dad, and the kids.  But a few times over the years, only the kids’ pictures made the cut : )  We save a card a frame it in a festive/Christmas frame.  We then add it to our ever growing collection of family Christmas photos.  Gabe is 11 now, and I count 10 frames in our decorations this year.  We did skip Christmas cards the year I was newly pregnant with Ashby and puking my brains out!  And people called…and emailed.  They wanted to make sure we were okay, since they hadn’t received our card.  They missed us!  Anyway, I get really excited every year when I open the box of framed photos and display them for the few weeks before Christmas.  It’s so fun to see how the kids have grown and the different pictures we have taken over the years.  Oh, and a little tip…if you are using a photo card from Shutterfly, Costco, Snapfish, or some other card template, just order an extra 4x6 or 5x7 print of the Christmas photo to frame.  It fits much better in the frame than the one from the Christmas card itself.

Here is a picture of our little photo display.

Dec 8 2011 023


I never knew it was so difficult to take pictures of “pictures”  Sorry for the bad glare on those top two! 

We like to have fun with it.  In fact, here’s a sneak peak of what will arrive in some of my friends and family’s mailboxes this year…hee hee

Christmas Kids 2011 131

For those procrastinators like me (I know you’re out there), happy decorating!  For those who are finished, you’re are definitely invited over to help me finish mine!


Linking up to these great parties:

Tickled Pink Fridays @504 Main, Friday Flair at Whipperberry, Pity Party at 30 Days, Feature yourself Friday at FOTF, Weekend Wrap up Party at Tatertots and Jello, Think Pink Sundays at Flamingo Toes


PhotobucketA Crafty Soiree


Weekend Bloggy Reading


The 36th Avenue
Catch a Glimpse Button


Tip Junkie handmade projects


Friday, December 2, 2011

Paper Origami, Twine, Burlap, and Sweater Christmas trees

Whew!  That was quite a title wasn’t it? 

Let’s begin at the beginning shall we?  I scored 3 cardboard Christmas Tree forms at Hobby Lobby last year after Christmas for 85% off!  So, I’ve had a whole year to think about what I wanted to do with them.  Well, I just started thinking about it 2 days ago : )  I wanted to use natural elements/colors and try to do something that I hadn’t seen done before, or at least try a new twist on something I had seen before. 


Origami Christmas trees

First, I came up with the Paper Origami Tree:

paper origami christmas tree

Don’t let the word origami scare you.  It really wasn’t that difficult.  I cut and folded all the pieces in one night while watching a couple of hours of mindless TV.

You will need these supplies:

-hot glue gun
-book or book pages
-scissors
-ruler
-index cards
I had a book that I was saving for a book page project.  It wasn’t old, but it had old looking pages and some neat gray borders and letters at the beginning of each chapter.  I kept those pages in mind when I was cutting out my squares. 
Dec 2 2011 022

Cut your index cards to use as your templates.  You’ll need a 3x3 card and a 2 1/4 x 2 1/4 card to use for your two different size folded pieces. 

Dec 2 2011 023

Then just cut away.  You’ll have to eyeball how many you’ll need.  I’d suggest doing one side of the tree first, and then you’ll know what you need to complete the rest.

Next start folding like so…
fold in half from the bottom up                                    

Fold one side up from middle to meet at the top point as shown.                             


Fold the other side up to meet the top middle as shown.                                 

Turn paper over so that open side faces down as shown.


  Bend your paper so it creases in the middle.

Flip it over, and it should look like this.  This is your    

This last one is the "leaf" you will be gluing to your Christmas tree.  Glue, glue and more glue until you get the look you want.  I started with the bigger leaves and moved up the tree with the smaller ones.   Then I finished it off at the top with the larger size.  If you have any gaps, cut your extra leaves in half and glue them in place to hide any empty spots. 

Dec 2 2011 041


Then I topped it off with a wooden bead and a green twine bow.  I tried to incorporate just a little bit of green in each tree to try to tie them together, since they were all natural but all very different.
Dec 2 2011 060

For the twine tree, all I had to do was wrap and hot glue.  No long tutorial here.  So easy!  I used 3 different colors and widths of twine.  And just a little tip… don’t spend a ton of money on jute or twine at the craft stores.  I bought all 3 of my rolls at Big lots for less than $2.50 per roll in the automotive section.

Dec 2 2011 066

For my last tree, I used burlap and sweater ruffles.  For the burlap layers, I just winged it.  I cut off strips of burlap and pinned them to my tree using straight pins.  Then I just eye-balled as I tucked and pinned around the tree.  I secured it underneath the ruffle with hot glue. 

Dec 2 2011 080b

For the sweater ruffles, I just cut strips from an old sweater and gathered them at the top by hand using a whip stitch.  I then hot glued them to my tree.  I wrapped the very top of the tree with a piece of burlap and glued it in place and then wrapped it up with some more green twine to tie this tree in with the trio.  I added a little bunch of curled book page “ribbon” as a tree topper too!

Dec 2 2011 079

Here are the triplets all together.  What do you think?  I made them all different, but I wanted them to fit together.  So, the green twine is my common item.  I’m not sure where they will land in the Christmas scenery around here.  The boxes and bins have not yet made it down from the attic.  That is this weekend.  So excited!

Dec 2 2011 086


Happy Decorating!


Linking up to these great Parties:
Better Late than never Christmas Inspirations

Feature yourself Friday at Fingerprints on the Fridge, Weekend Wrap up Party at Tatertots and Jello, Saturday Night Special at Funky Junk Interiors, Strut your stuff Saturday at Six Sisters Stuff, Tip Junkie Homemade Projects, Homemade Christmas at the Scrap Shoppe


Photobucket


Weekend Bloggy Reading


Positively Splendid


Thirty Hand Made Days

Link Party


Somewhat Simple


Todays Creative Blog


Sunday's Best Linky Party!Tickled Pink at 504 Main