Showing posts with label tutorials. Show all posts

Tuesday, October 30, 2012

5 Simple Must Have items for painting furniture


This post came about in a funny way.  After losing the same items over and over in my garage, I began to think that I am unorganized and beyond hope.  I decided to solve this little problem by making sure that I had at least 2 of my “necessary” items on hand, so that when I really needed them, I could put my hands on at least one.  Yes, I know “everything in its proper place…”.  But, this works for me –okay?  


So what are these items that I am constantly using and always losing?  They are so basic, it’s almost silly to post about them,  But, I’ll bet there’s at least one person out there like me who needs to go ahead and buy 2 just in case one is ummm…misplaced :)

For painting furniture, these are my go-to items:


1- Purdy Cub paintbrush
Yes, there are tons of other paintbrushes out there, but for me and my small hands, the cub is my BFF.  And if you take good care of it, it will last for a long, long time.


purdy cub
image via


2-  Plastic Scraper
This simple and inexpensive tool comes in various widths.  Buy several; they are cheap.  They are great for scraping off excess paint after sanding and for getting the goo off left over from labels and stickers.
plastic scraper
image via


3- Paper plates
Again simple and inexpensive.  I almost never use the paint trays that they sell at the home improvement stores, unless I’m using a roller.  And that’s really ,really rare.  So a good ole paper plate does the trick for mixing colors, thinning paint, and providing a disposable palette.
paper plates
image via


4- Drop cloth
Yes, you can use old sheets, towels, blankets, etc. to paint on.  I have done that and still do sometimes.  But in my experience, nothing beats the drop cloth!  The seams on a drop cloth are weighted just a bit.  So, as you are painting that end table, a big gust of wind doesn’t come along and blow your sheet over the freshly painted side of the table causing it to stick.  Don’t ask me how I know!  The big box stores charge quite a bit for drop cloths, but I’ll tell you a secret.  Shhh… If you are lucky enough to have a Big Lots in your town, buy your drop cloths there.  They are half the price.  And if you are really frugal like I am, you can cut off one whole panel or at least six inches or so along one side to get crafty with.  Make yourself a banner like this Candy Corn Banner

pumpkin bunting


5-Baby wipes
What can I say, painting is messy, and I like to hide the evidence- quick!  No really, baby wipes are wonderful to have on hand, because they stay wet all the time and are portable and handy.  I buy the generic- whatever is on sale type.

wipes
image via


Okay, I’ll bet you are really ready to tackle a big ole painting project now huh?  Doubtful, but I did want to share a few of my favorite little things that keep me going as I paint all kinds of furniture with different kinds of paint.  There are so many other cool tools out there, but these top 5 are “must have’s “ for me to even get started.  Maybe I’ll talk about paint next, or how to choose a good piece of furniture…. keep reading along.


Share:  What are your favorite painting “tools” ?  You can leave a comment here on the blog, or on my Facebook page.  I’d love to know what you find invaluable.  A few of my Facebook friends have already chimed in.  Go check it out.  And “like” my page to keep updated.  You never know what I may come up with next….



Joining these great parties:
 Tutorials and Tips at Home stories A to Z
Meet me Monday at You're Talking too Much 

Friday, December 2, 2011

Paper Origami, Twine, Burlap, and Sweater Christmas trees

Whew!  That was quite a title wasn’t it? 

Let’s begin at the beginning shall we?  I scored 3 cardboard Christmas Tree forms at Hobby Lobby last year after Christmas for 85% off!  So, I’ve had a whole year to think about what I wanted to do with them.  Well, I just started thinking about it 2 days ago : )  I wanted to use natural elements/colors and try to do something that I hadn’t seen done before, or at least try a new twist on something I had seen before. 


Origami Christmas trees

First, I came up with the Paper Origami Tree:

paper origami christmas tree

Don’t let the word origami scare you.  It really wasn’t that difficult.  I cut and folded all the pieces in one night while watching a couple of hours of mindless TV.

You will need these supplies:

-hot glue gun
-book or book pages
-scissors
-ruler
-index cards
I had a book that I was saving for a book page project.  It wasn’t old, but it had old looking pages and some neat gray borders and letters at the beginning of each chapter.  I kept those pages in mind when I was cutting out my squares. 
Dec 2 2011 022

Cut your index cards to use as your templates.  You’ll need a 3x3 card and a 2 1/4 x 2 1/4 card to use for your two different size folded pieces. 

Dec 2 2011 023

Then just cut away.  You’ll have to eyeball how many you’ll need.  I’d suggest doing one side of the tree first, and then you’ll know what you need to complete the rest.

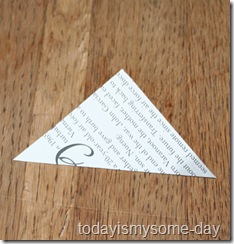
Next start folding like so…
fold in half from the bottom up                                    

Fold one side up from middle to meet at the top point as shown.                             


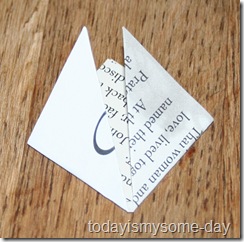
Fold the other side up to meet the top middle as shown.                                 

Turn paper over so that open side faces down as shown.


  Bend your paper so it creases in the middle.

Flip it over, and it should look like this.  This is your    

This last one is the "leaf" you will be gluing to your Christmas tree.  Glue, glue and more glue until you get the look you want.  I started with the bigger leaves and moved up the tree with the smaller ones.   Then I finished it off at the top with the larger size.  If you have any gaps, cut your extra leaves in half and glue them in place to hide any empty spots. 

Dec 2 2011 041


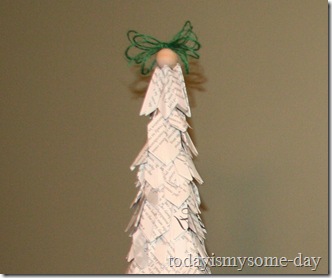
Then I topped it off with a wooden bead and a green twine bow.  I tried to incorporate just a little bit of green in each tree to try to tie them together, since they were all natural but all very different.
Dec 2 2011 060

For the twine tree, all I had to do was wrap and hot glue.  No long tutorial here.  So easy!  I used 3 different colors and widths of twine.  And just a little tip… don’t spend a ton of money on jute or twine at the craft stores.  I bought all 3 of my rolls at Big lots for less than $2.50 per roll in the automotive section.

Dec 2 2011 066

For my last tree, I used burlap and sweater ruffles.  For the burlap layers, I just winged it.  I cut off strips of burlap and pinned them to my tree using straight pins.  Then I just eye-balled as I tucked and pinned around the tree.  I secured it underneath the ruffle with hot glue. 

Dec 2 2011 080b

For the sweater ruffles, I just cut strips from an old sweater and gathered them at the top by hand using a whip stitch.  I then hot glued them to my tree.  I wrapped the very top of the tree with a piece of burlap and glued it in place and then wrapped it up with some more green twine to tie this tree in with the trio.  I added a little bunch of curled book page “ribbon” as a tree topper too!

Dec 2 2011 079

Here are the triplets all together.  What do you think?  I made them all different, but I wanted them to fit together.  So, the green twine is my common item.  I’m not sure where they will land in the Christmas scenery around here.  The boxes and bins have not yet made it down from the attic.  That is this weekend.  So excited!

Dec 2 2011 086


Happy Decorating!


Linking up to these great Parties:
Better Late than never Christmas Inspirations

Feature yourself Friday at Fingerprints on the Fridge, Weekend Wrap up Party at Tatertots and Jello, Saturday Night Special at Funky Junk Interiors, Strut your stuff Saturday at Six Sisters Stuff, Tip Junkie Homemade Projects, Homemade Christmas at the Scrap Shoppe


Photobucket


Weekend Bloggy Reading


Positively Splendid


Thirty Hand Made Days

Link Party


Somewhat Simple


Todays Creative Blog


Sunday's Best Linky Party!Tickled Pink at 504 Main


Friday, November 18, 2011

Tote bag using the Citrasolv transfer method

Before I dive into the how-to for my little tote bag this week, I want to say THANK YOU to all of you who are following my little blog!  I reached a milestone this week when I hit 100 followers!   Wow!  I can’t believe that 100 people have ever even looked at my blog!  The number snuck up on me, so I don’t have any fabulous giveaways or anything –yet.  But stay tuned, I might have something up my sleeve before Christmas.  Keep watching, because I wouldn’t want you to miss it…
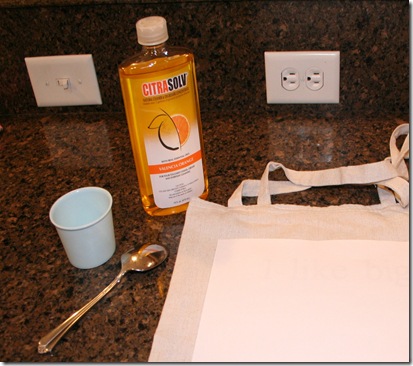
I have seen the Citrasolv transfer projects all over the internet. My friend Jaime at Crafty, Scrappy, Happy did a couple of adorable tote bags, and I wanted to try my hand at it too.  Citrasolv is an all natural degreaser that can also be used in crafting as a transfer agent.  The website has loads of helpful information.  My #1 piece of advice for Citrasolv is that if you want to get some, start looking waaayyy before you decide you need it, or simply order online.  This stuff is hard to find.  I found mine at a little health food store in St. Augustine, when the hubs and I were on our anniversary trip (I know- so romantic!).

There are many tutorials all over the web, so I’m going to make mine very simple.  Leave me a comment if you have any questions, and I’ll be happy to help, if I can.

Citrasolv transfer tote bag 7

Sorry for the horrible lighting.  My usual outdoor picture spot was already shady today when I went out for the “photo shoot”.  I saw this little phrase on Pinterest the other day, and couldn’t help but file it away for later and giggle.  I have several friends who are big readers… Maybe one of them will get this little bag for Christmas.  Hope they aren’t reading this!  If you don’t “get” this phrase, thank your lucky stars that you missed out on that song in the early 90’s.  Just sayin'!

Okay, here’s what you do.  Create a document or grab a graphic that you will either print or copy in black and white using a laser printer or copier.  It must be laser, or the transfer will not work.  When you print out your words or image, choose mirror image so it will print in reverse.  That way the ink will be sitting on top of your fabric like so:

November 18 2011 013

   November 18 2011 011

Then you will take a small sponge or paintbrush and dip it into the Citrasolv and wet your paper so that it soaks through to the fabric.  Don’t drench it, but use enough so that the letters get good and wet.  Then take the back of a spoon, and rub really hard on the letters to make sure that they transfer.  Look at this tutorial for pictures of this step.  You may want to peek to see if it’s working, but don’t move your image around.  Once you are sure that everything has transferred, you can peel back your paper and toss it away.  Your bag is finished!  Easy peasy!


Nov 18 2011 012

I used a linen type bag, so my lettering is kind of faded looking.  I like it like that, but if you want crisp black, use a white fabric and make sure your image is really dark when you copy it.

I added a little denim flower to finish it off.  I liked the faded denim against the linen bag and “faded” lettering.  The flower is a pin that can be taken off and worn on a jacket or purse as well.  A gift that keeps on giving!  I followed this tutorial at Jones Design Company for the flower.  She has the best flower tutorials around!  This one even has templates you print and cut.  So simple…

Nov 18 2011 008

So, that’s how you make a Citrasolv transfer tote bag.  Easy right?  I’m gonna practice using some different images and fabrics.  I’ll be back to show you those later on.  Okay?

Happy Thanksgiving!


Linking up to these great parties:

30 Days Pity Party, Weekend Wrapup at Tatertots and Jello, Crafty, Scrappy, Happy Me Thursday, Show and Share at Southern Lovely, Time to shine at A diamond in the Stuff, Weekend bloggy Reading at Serenity Now, Free for all at Young and Crafty, Think Pink Sundays at Flamingo Toes, Nifty Thrifty Sunday

Tuesday, September 20, 2011

How to make a simple burlap flower

Remember these burlap flowers?

Sept 8 2011 013

I was asked by a reader how to make them and if I’d do a tutorial.  Seriously? Would I?  Well, okay, but don’t get too excited…there’s not much to it! 

First you’ll need some burlap.  For the larger flower, I cut a strip of burlap about 12 inches long and 4 1/2 inches wide.  For the smaller one, I used a strip about 10 inches long and 3 inches wide. 

Sept 20 005

Fold the burlap in half lengthwise like this:
Sept 20 006


Then stitch the open ends closed.  Use a thread that is close to the burlap color that you are using so that you can’t see the stitching later on.  Since burlap is such an open weave, I double threaded my needle and made an extra big knot at the end.  Stay close to the edge when stitching but not too close as the burlap tends to unravel easily.  See the pieces coming apart in the photo?
After your ends are stitched all the way closed, turn your fabric inside out.  Do this carefully, as the unraveling is bound to happen.

Sept 20 008  

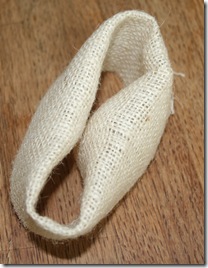
Once you have turned it inside out, it should look like this:

Sept 20 010

Now fold the fabric in half so that you have a folded side and a rough side.  It will now be half the width that you started with.
    Sept 20 012     Sept 20 013

Now, take your needle and thread and sew a basting stitch along the rough edge of the burlap circle.  Stay about 1/4 inch away from the edge, so that you don’t unravel and lose your stitching.  After every few stitches, pull the thread to gather and hold.  You want to pull tight enough to gather the flower, but not too tight or the thread will break.  TRUST ME ON THIS ONE.
Sept 20 016   Sept 20 021

Continue all the way around until you have tightly gathered your thread and have reached the point where you started.  With so much fraying, burlap flowers are not going to be pretty on the back side.  With that in mind, I use several stitches across and around the back of my flower to be sure that it is nice and tight and that any loose parts are tucked in.

Sept 20 014
Finished: Back

Sept 20 015
Finished:  Front

Now, time to embellish.  You can use anything you’d like to dress up your burlap flower.  Buttons, small felt flowers, jewels, or whatever strikes your fancy. 

I used buttons in my original flowers, and I went to my button stash again for this new flower today.

Sept 20 2011 010


I didn’t actually sew this one on, but I wanted it to look like I had.  So, I cheated and took 2 pieces of the burlap that had frayed.  I hand threaded them through the button holes, and cut off the excess.  I then hot glued on my button.

Sept 20 2011 006

I still like my original ones best.  I think it’s because they are a bit smaller than this one and therefore, the flower folds are more pronounced.  And the hounds tooth buttons are just too cute!

Sept 8 2011 013


Sending you flowers,


Linking up to these great parties.

HomestoriesAtoZ; Under the Table and Dreaming