Whew! That was quite a title wasn’t it?
Let’s begin at the beginning shall we? I scored 3 cardboard Christmas Tree forms at Hobby Lobby last year after Christmas for 85% off! So, I’ve had a whole year to think about what I wanted to do with them. Well, I just started thinking about it 2 days ago : ) I wanted to use natural elements/colors and try to do something that I hadn’t seen done before, or at least try a new twist on something I had seen before.
 First, I came up with the Paper Origami Tree:
 Don’t let the word origami scare you. It really wasn’t that difficult. I cut and folded all the pieces in one night while watching a couple of hours of mindless TV.
You will need these supplies:
-hot glue gun
-book or book pages
-scissors
-ruler
-index cards
I had a book that I was saving for a book page project. It wasn’t old, but it had old looking pages and some neat gray borders and letters at the beginning of each chapter. I kept those pages in mind when I was cutting out my squares.
Don’t let the word origami scare you. It really wasn’t that difficult. I cut and folded all the pieces in one night while watching a couple of hours of mindless TV.
You will need these supplies:
-hot glue gun
-book or book pages
-scissors
-ruler
-index cards
I had a book that I was saving for a book page project. It wasn’t old, but it had old looking pages and some neat gray borders and letters at the beginning of each chapter. I kept those pages in mind when I was cutting out my squares.
 Cut your index cards to use as your templates. You’ll need a 3x3 card and a 2 1/4 x 2 1/4 card to use for your two different size folded pieces.
 Then just cut away. You’ll have to eyeball how many you’ll need. I’d suggest doing one side of the tree first, and then you’ll know what you need to complete the rest.
Next start folding like so…
Then just cut away. You’ll have to eyeball how many you’ll need. I’d suggest doing one side of the tree first, and then you’ll know what you need to complete the rest.
Next start folding like so…
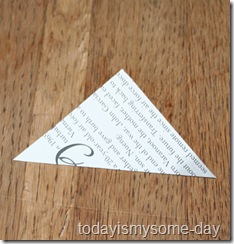

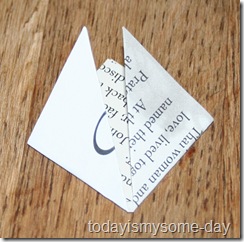

![]()

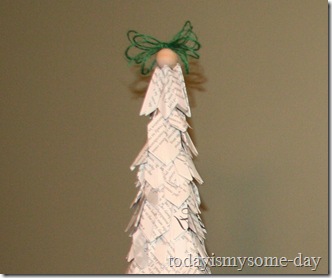
 This last one is the "leaf" you will be gluing to your Christmas tree. Glue, glue and more glue until you get the look you want. I started with the bigger leaves and moved up the tree with the smaller ones. Then I finished it off at the top with the larger size. If you have any gaps, cut your extra leaves in half and glue them in place to hide any empty spots.
 Then I topped it off with a wooden bead and a green twine bow. I tried to incorporate just a little bit of green in each tree to try to tie them together, since they were all natural but all very different.
 For the twine tree, all I had to do was wrap and hot glue. No long tutorial here. So easy! I used 3 different colors and widths of twine. And just a little tip… don’t spend a ton of money on jute or twine at the craft stores. I bought all 3 of my rolls at Big lots for less than $2.50 per roll in the automotive section.
 For my last tree, I used burlap and sweater ruffles. For the burlap layers, I just winged it. I cut off strips of burlap and pinned them to my tree using straight pins. Then I just eye-balled as I tucked and pinned around the tree. I secured it underneath the ruffle with hot glue.
 For the sweater ruffles, I just cut strips from an old sweater and gathered them at the top by hand using a whip stitch. I then hot glued them to my tree. I wrapped the very top of the tree with a piece of burlap and glued it in place and then wrapped it up with some more green twine to tie this tree in with the trio. I added a little bunch of curled book page “ribbon” as a tree topper too!
 Here are the triplets all together. What do you think? I made them all different, but I wanted them to fit together. So, the green twine is my common item. I’m not sure where they will land in the Christmas scenery around here. The boxes and bins have not yet made it down from the attic. That is this weekend. So excited!
 Happy Decorating!

Linking up to these great
Parties:
Better Late than never Christmas Inspirations
Feature yourself Friday at Fingerprints on the Fridge,
Weekend Wrap up Party at Tatertots and Jello,
Saturday Night Special at Funky Junk Interiors,
Strut your stuff Saturday at Six Sisters Stuff,
Tip Junkie Homemade Projects,
Homemade Christmas at the Scrap Shoppe